Pages

Sunday, 18 December 2011

Playing around with Cupcakes!


Hi there!

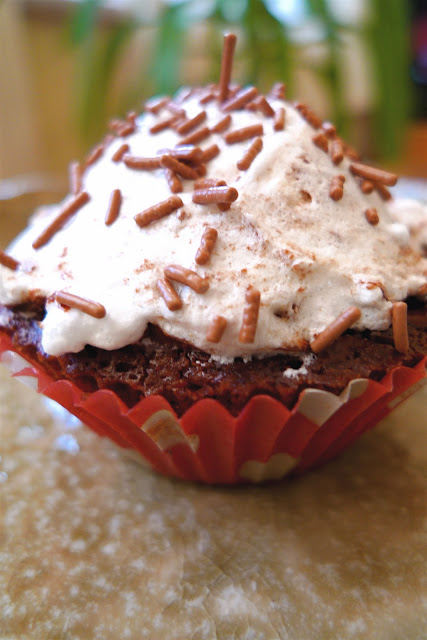
Who doesn’t like cupcakes? Well I love them for their taste as well as their presentation. The only think that I have a slight problem with sometimes is the heavy icing a lot of them have. Even though it tastes delicious sometimes my belly doesn’t like the heavy dairy. So I decided to opt for an egg white icing as it is much lighter and lets face it there are a lot less calories.


I ended up playing around with the presentation so they all turned out a little different from each other.
 
 
Ingredients:

30g ghee
30g coconut oil
30g olive oil
…or instead you could use 90g of butter. I just wanted to experiment with other ingredients as butter sometimes upsets my stomach. But I have to say there is nothing else like butter when it comes to the taste!
40g caster sugar
1 tbsp honey
1 large egg - beaten
1/4 tsp almond or vanilla extract
85g plain flour (I used gluten-free)
1/4 tsp baking powder
1 tbsp cocoa powder

1 egg white
2-3 tbsp  icing sugar
50g of good quality dark chocolate - broken into pieces
A handful of crushed walnuts

Preheat the oven to Gas mark 4

In a large bowl add the ghee, coconut oil, olive oil, caster sugar and honey and beat together until the mixture is creamy.  Add the egg and almond or vanilla extract and mix well.  Fold in the flour, baking powder and cocoa powder.
Spoon the mixture into the cup cake cases and bake in the oven for 15-20 min. Allow them to cool completely before putting any icing on.

Place the chocolate in a heatproof bowl on top of a saucepan full of a little simmering water and slowly allow the chocolate to melt. Take off the heat and set aside.
To make the icing, place the egg white and icing sugar in a bowl and whisk with an electric whisker for about 2 minutes until creamy and smooth. Do not over whisk.  You could probably add a drop of colouring for a pop of colour.

Use your imagination when it comes to decorating the cupcakes. I used just chocolate on some with a sprinkle on walnuts. On others I used icing first with a splash of chocolate on top. It’s your game.
Best to serve them straight away :)

Enjoy!
Monday, 28 November 2011

Cinnamon Apple Tart

This week I decided to make an apple tart. I love the taste of baked apples and as it is December and it's cold outside I added cinnamon for warmth. 
A few months ago I had a try at making filo pastry for a strudel. Unfortunately the filo was a slight disaster :) The filling for the strudel however was delicious. So the idea of adding raisins to my apple tart  came from my failed strudel. I think they add a little extra sweetness and chewiness to the dessert.


For the dough I followed a recipe from Michel Roux's Pasrty book. After failing at his filo recipe I feel with this one I was much more successful - it must be simply because it's an easier, more straight forward recipe :) However I did need to add a little more flour when kneading the dough as it felt too wet and sticky. 


Overall the tart ended up looking a little more rustic than elegant, but the taste was great!


Ingredients

Pastry:
125g plain flour
60g unsalted slightly soft butter, cut into small cubes
1 small egg
1/2 tsp caster sugar
1/4 tsp salt
20ml cold water

Filling:
4 apples, I used golden delicious but other cooking apples will work too
80 -100g raisins 
juice of 1/2 lemon
1 tsp cinnamon
2 tbsp coconut oil  OR unsalted butter
40ml water
2 tbsp honey
40ml water 

To make pastry, heap the flour onto your work surface and make a well in the middle. Put butter, egg, sugar, and salt in the center of the well. Using you fingers mix all the ingredients except flour until creamy.
Start drawing in the flour little by little into the center and work the dough into a grainy texture. Then add the water and mix until the dough starts to hold together. At this point I had to add a little extra flour in order to form a dough I could knead. Using the palm of your hand push the dough away from you 5-6 times until smooth. Shape the dough into a ball, wrap it in cling film and place in the fridge until you are ready to use it. I used mine the following day.

The journey continues....

.....Take your dough and roll it out on a slightly floured surface until the thickness is about 3-4mm. Transfer it to your loose bottom tart tin and press it gently into the shape, taking care not to tear it. Leave the edges just slightly higher than the tin. Place in the fridge for about 30min. 

Wash, peel and core the apples. Cut in half and cut into slices about 4-5mm wide. Once all the apples are sliced, place one third of them in a small saucepan as they will be made into a puree-like mixture for the base of the filling. Place the rest of the apples in a another bowl and add the lemon juice, cinnamon, and gently mix. Cover and put aside. 
Add 40ml of water to the apples in the saucepan plus the coconut oil or butter and cook on a medium heat for 4-5min until the apples are very soft and can be worked into a puree-like creamy mixture, using a fork. When ready leave to cool. 
To make the glaze, simply add the honey to the water and simmer for 5min on low heat. Leave to cool.
Take your tart tin out of the fridge and spread the apple mixture evenly. Sprinkle the raisins and arrange the apple slices on top in way you wish. However you think looks pretty. At the center you can either add smaller pieces of apples (I personally ran out, because I only used three apples, oops) or add more raisins. 
Bake the tart in the oven for 40min on 200C/Gas Mark 6 until the pastry and apples look golden. Let it cool for 15min before removing it from the tin. Brush it with the sweet syrup and serve.

PS On my photographs you can see some red currants. I removed those from the ingredients list as they ended up too dry and slightly overpowering.

Enjoy!


Wednesday, 23 November 2011

Olive and Tomato Lazy Bread

This week I made a bread inspired by one of my grandmother's recipes which I grew up having. She calls it Lazy Bread because it is so simple to make. We would have it for breakfast with some yogurt on the side.


In the original recipe the ingredients are even fewer than in my version. I decided to make it a little more pizza like, by adding olives, tomatoes and thyme. I also think that basil would have worked lovely, but sadly the store was all out. I also reduced the amount of flour by half and included polenta instead.

I am very happy with how it turned out. It’s very moist and flavourful. It makes a great addition to many meals, I had mine with salad and a piece of grilled fish. 


Serves 3-4

Ingredients:

2 eggs
1 tsp of olive oil
1/2 tsp of baking soda
1/2 cup of natural yogurt
1/2 cup of plain flour
1/2 cup of ground polenta
100g feta cheese
2 small tomatoes - chopped
100g mixed olives - chopped
a pinch of salt
a sprinkle of dry thyme


In a large bowl whisk the eggs and add the oil.  To that add yogurt, flour, polenta, baking powder and mix well into a thick mixture. Crumble feta cheese in  and add  tomatoes, olives, salt and thyme, and fold into the mixture.

Preheat oven on Gas mark 6.

Use a little oil and spread it around your choice of baking tin. Pour your mixture in and bake in the oven for about 40 min or until an inserted skewer comes out clean. When ready take out and let it cool on a wire rack before slicing it.

Enjoy!


Monday, 14 November 2011

Raspberry & Lemon Cake

Hello,

This is officially my first post for Enterprise Bakes. Baking is one of the things that gives me great joy and I look forward to sharing many recipes with you in the future.
I though I would start with what I call a pretty recipe. I love baking all sorts of things, but it's always nice when there is a pop of colour on the final outcome. In this case it comes from lovely, red, juicy raspberries.


I look through cook books all the time and pick up recipes. But every time I make something I like to change little things to make it my own. In this case I was inspired by Tana Ramsey's recipe for Raspberry and Lemon Torta. I stuck to the basics, but I did reduce the amount of raspberries and slightly increased the amount of lemon juice and zest. I also decided to make it in a simple bundt cake tin and see if it would still look attractive - I think it does.
I also like to make cakes and tarts smaller than the usual cook book recipe size, so I normally half the amount of the ingredients from the original recipe. Unless of course I am baking for a larger number of people. 

So this recipe serves 4-5 instead of 8. 


Ingredients:

55g unsalted butter, gently melted & cooled, plus a little extra for tin
200g raspberries
125g plain flour, sifted
110g caster sugar
2 small OR 1 large free range eggs
1 tsp of baking powder
juice of 1 small lemon
zest of 1 lemon

1. Preheat oven to 160C/gas mark 3 and butter your cake tin well.
2.Place raspberries and lemon juice in a bowl and leave aside. In a separate larger bowl whisk sugar and eggs well, until pale. Carefully fold in the flour, baking powder and lemon zest. Then stir in the butter.
3. Pour the batter into the buttered tin and scatter the raspberry and lemon juice mixture on top. Light press them with a spoon so they sink in a little.
4.Bake for about 45min or until an inserted skewer comes out clean and the cake is slightly shrunk from the edges.
5. Allow to cool in the oven then turn out. Usually bundt cakes are served upside down, but in order to see the raspberries I flipped it over again once it was out of the tin.

I haven't tried it, but I am sure that this recipe would work with blueberries, strawberries, finely chopped apples or apricots.